Posts

Showing posts with the label Flower Pot

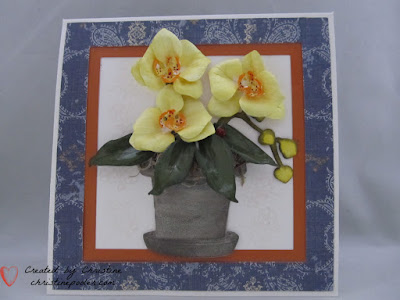
Potted Orchid

Image
  Hello my crafty friends! Today I have a card I created per request of a friend.  Susan's Garden Notes Phalaenopsis (Moth Orchid) is the flower in Susan's Garden Notes Potted was used along with Fitted Stitch Frame It Square dies. Susan has a video on her Facebook page Susan's Garden Club for the orchid. You can find video here  6" X 6"  bright white card blank. Patterned paper cut to 5-3/4" X 5-3/4" die cut square in center. Burnt Orange cardstock cut 5-1/2" X 5-1/2" next smaller square cut in center.  Using clear double sided adhesive attach patterned paper over orange cardstock lining up so it is even all around then adhere to card front using clear double sided adhesive. Cut 2 pots from cardstock with clear double sided adhesive on back - 1 from gray card stock 1 from white soft finish cardstock. Adhere white on top of gray one.  Using alcohol markers color and shade.  Remove protective backing add couple of dimension squares lower center

Think Happy

Image
For today's challenge Elizabeth Craft Designs  are giving away a  $20 Gift Card to use on the Elizabeth Craft Designs website   to 3 winners.  To enter simply leave a comment on the  Elizabeth Craft Designs Challenge post and tell us “Which dies from Susan’s collection make you think of your home?” We will select 3 lucky winners in a random drawing The winners will be announced on Friday, August 11  on the Elizabeth Craft Designs blog. http://wp.me/p4kQzc-6Sg http://wp.me/p4kQzc-6Sg   Hello everyone welcome to my blog.  Today is Susan's Garden Design Team second challenge.   This month we have been challenged to use new Cottage Dies, Window & Flower Box, Doors etc.  I have chosen Susan's new release  Square Window & Flower Box Die Set.  On my card I used patterned paper that I had purchased (I am trying to use up some of my large paper stash) but how cool would it be to take a picture out your own window and print onto cardstock. Here is how card was created.  Car

Potted Poinsettia

Image
Hi Everyone hope that you all have had a great Christmas - ours was great spending time with family and friends. Today I am posting a birthday card for a dear friend with whom I have been friends with for about 60 years.  My card  uses Karen Burniston's Flower Pot Pop Stand and Susan's Garden Notes Small Poinsettia as well as her White Pine Boughs & Pinecones along with Els van de Burgt Holiday Garlands 2 and A Way With Words Happy Birthday. Here is how I made the card. Using Karen Burniston's video and Flower Pot Pop Stand die set - the flower pot cut from a color cardstock of your choice (Sea Glass was used here).  Cut and build the flower pot according to the video. Using Susan's Garden Notes Small Poinsettia and white cardstock cut 7 or 8 poinsettias making sure you cut a set from green cardstock for each flower.  Shade and shape each flower using Susan's PanPastels Set 1 and her 4 pc Tool Kit.  Susan has a great video to help you with this you can find

Up On the Roof Top

Image
Hello Everyone thanks for stopping by my blog today.  Today I have created kind of a fun card that has Santa and his satchel going head first down the chimney.  My card base was made by using Karen Burniston's Flower Pot Pop Stand Die Set. Here is how it was done  Cut flower pot from light gray cardstock you will need to cut it twice.  Find your score lines and fold all of them (this is important to do before embossing as it will make it easier to find them after embossing - ask me how I know ).  Depending on how big your brick embossing folder is you may be able to do both at once  but lay the flat pieces in the embossing folder and run through machine.  Try to have a couple of sides straight as possible and use these sides for front of card (Again ask me how I know).  Take cranberry ink pad and rub over the bricks which will color the bricks but leave mortar area gray.  Use Karen's great video to build the flower pot.  For this card you can either cut the top flaps off or g

Potted & Framed Amaryllis

Image
Hello Everyone,  thanks for stopping by today.  Here in Maine we got a little snow a few days ago but then it turned to rain and in my area it is gone - I am really not looking forward to winter it lasts way too long! My post today uses Susan's Garden Notes Amaryllis and Potted along with Els van de Burgt's new Holiday Garlands 1.  Let's get started. Cut off white cardstock 6" X 12" score at 6" and fold on score line forming your 6"x 6" card base.  Ink all edges (Vintage Photo Distress Ink used here). Cut Patterned paper 6" X 6" ink all edges with same ink.  Using Clear Double Sided Adhesive attach to card front. Cut green cardstock 6" X 6".  Cut from outer edges 1/2" in all around remove center square to reveal a frame.  Use dimensional tape to attach to front of card. Cut pot from off white cardstock distress the pot (Vintage Photo Distress Ink used here).  using loop tool from Susan's 4pc. Tool Kit lay pot fac

Jasmine & Roses

Image
Today my post is another card inspired by my recent tour of the Olson House in Cushing, Maine.   I believe as a crafter we look at everything in a different way at least I do.  I am sure some of those that were in our tour group probably thought that I was a “tad bit” crazy when I got so excited over the peeling wallpaper, cracked walls and wide painted floorboards and proceeded to take pictures of these items.  The background paper I used today is from my picture I took of the peeling wall paper then printed on cardstock.  When I was looking at the wall that day I could just picture some of Susan’s Garden Note Roses on that background.   I have chosen Susan’s new soon to be released Susan’s Garden Note Plant Pot die using her Garden Notes Rose 2 and Jasmine from her previous releases.  I also used Els Leafy Branch, Dotted Scallop Rectangles, Bead Strings 1 and Joset Designs General Sentiments stamp set.  I know it is another card with roses but I just love them and I think that someti